Up until this point we've talked about widgets, text associations and evaluations purely theoretically. In this section you're going to learn about some of the widgets that are available for use in the Kommander system, how to actually setup text associations and finally understand how they do eventually get evaluated and used. Also, we will create a very simple dialog example that utilises what we've covered so far.
The editor is based on QT Designer, a dialog designed by Trolltech. We have modified QT Designer in the following ways -
| Its interface is much simpler |
| Built in our own text widgets |
| Added the ability to setup text associations |
| Various other superficial changes |
For those of you already familiar with using QT Designer, using the Kommander editor will be trivial. You should also consult the QT Designer documentation, as most of that documentation is still very pertinent to the use of the Kommander editor.
Our widgets are standard QT widgets, that also inherit a class AssocTextWidget. This class is what provides the extra text association functionality. We also have support for widget plugins, which makes it easy for C++ developers to build and distribute their own text widgets. A full reference of all the widgets implemented in Kommander can be found in the reference section of Part IV of this documentation. The best way to learn about the editor is to use it to do some simple tasks. We do exactly this in the next section.
First, start off by running the editor program kmdr-editor, which by default is installed in $KDEDIR/bin. If all went well, the editor will now be the active program. Select File->New, a dialog appears. This dialog shows the different types of main dialogs you can create for Kommander. For now these are simply a normal dialog, wizard, or any other custom template dialogs that you've created. Choose the standard Dialog, and then click OK.
You should now see a dialog inside the editor that looks something like what's shown in the screenshot below. We create our final dialog by adding widgets to this plain base dialog.
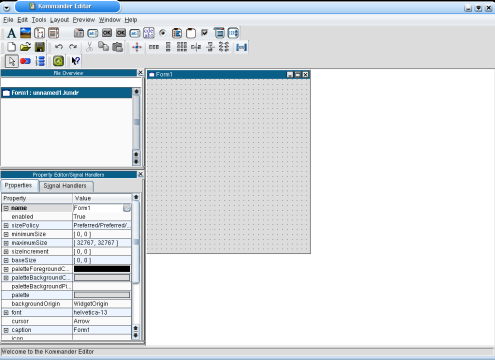
The dialog we are going to create is a very simple text editor made up of a dialog with a text edit, a file chooser, a save button, and a close button.
First, let's add the text edit to the dialog. A text edit is simply a widget
that provides a box that may have text inside of it. To add this widget, push
the TextEdit button in the toolbar  . When the button is depressed, this means that the text edit
is the current widget selected for insertion. All widgets available in the Kommander
system are available for insertion via the Kommander and various other toolbars,
but alternatively you may also choose to access these widgets from the Tools
menu. From here on we always refer to the toolbar for adding widgets, but you can
equivalently select them from the Tools menu without problem.
. When the button is depressed, this means that the text edit
is the current widget selected for insertion. All widgets available in the Kommander
system are available for insertion via the Kommander and various other toolbars,
but alternatively you may also choose to access these widgets from the Tools
menu. From here on we always refer to the toolbar for adding widgets, but you can
equivalently select them from the Tools menu without problem.
Move the mouse cursor anywhere inside your plain dialog(in the grey space, not inside its title bar) and click once. A text edit widget should appear inside the dialog. Don't be worried about its size or position for now; we will deal with such superficial issues a little later.
Like you did for the text editor, select the FileSelector button from the
Kommander toolbar near the top of the editor  . Click
anywhere below the text edit widget you created in your dialog, and a file
chooser widget will show up. A file chooser widget consists of a line edit which
holds the full filename of a file including its path, and a corresponding button
that brings up a dialog allowing the user to select a file. More information
about the this widget is in the reference section of
Part IV.
. Click
anywhere below the text edit widget you created in your dialog, and a file
chooser widget will show up. A file chooser widget consists of a line edit which
holds the full filename of a file including its path, and a corresponding button
that brings up a dialog allowing the user to select a file. More information
about the this widget is in the reference section of
Part IV.
Now select the ExecButton, again from the Kommander
toolbar  . Click anywhere below or beside the file chooser widget you
created just before. This widget is the button that will implement the saving of
the text inside the text edit widget, so we should name it appropriately. Right
click on the ExecButton widget you created, and select the menu option
Edit Text. Type in “Save” and then click
OK. The button now has an appropriate text label of “Save”.
. Click anywhere below or beside the file chooser widget you
created just before. This widget is the button that will implement the saving of
the text inside the text edit widget, so we should name it appropriately. Right
click on the ExecButton widget you created, and select the menu option
Edit Text. Type in “Save” and then click
OK. The button now has an appropriate text label of “Save”.
We've almost finished adding the widgets we need to our dialog. Finally, select
the CloseButton widget from the Kommander toolbar
 . The CloseButton widget, as its name implies, is a
button that simply exectutes its text association as a command line program and then closes the dialog that it
resides in when it is clicked. Click preferably next to or below the ExecButton
we created before. Right click on the widget and select
the option Edit Text; a dialog pops up. Type in
“Close” and then click OK. The button is now labelled
with the text “Close”.
. The CloseButton widget, as its name implies, is a
button that simply exectutes its text association as a command line program and then closes the dialog that it
resides in when it is clicked. Click preferably next to or below the ExecButton
we created before. Right click on the widget and select
the option Edit Text; a dialog pops up. Type in
“Close” and then click OK. The button is now labelled
with the text “Close”.
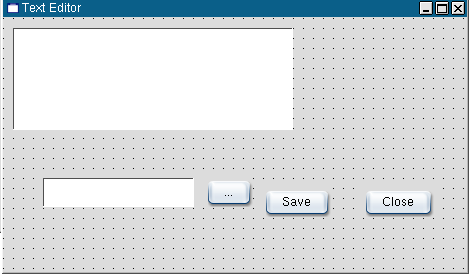
You should now have a dialog with four widgets on it that looks something like the screenshot below. If yours looks a little different, like the widgets are arranged a little differently, that's nothing to worry about. We are going to layout all of the dialog's widgets in the next section.
When adding the widgets in the previous section, we just arranged them roughly to how we wanted the end dialog to look. This is because we can easily arrange them automatically with very little work, as we are going to see now.
Click once on the FileSelector widget
you created in your dialog. It should now be selected. Shift+left click the ExecButton, followed by the
CloseButton. All three widgets should now be selected simultaneously. While they are selected,
left mouse button click on the Layout Horizontally button in the
Layout toolbar  .
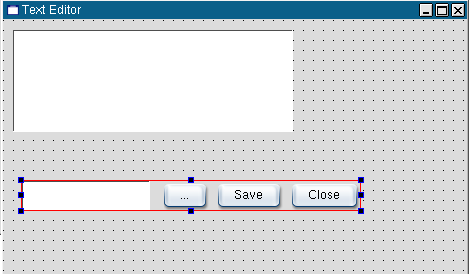
This will cause the 3 buttons that were selected to all be lined up together horizontally in
what's called in QT speak a “Layout”. We simply create layouts for our widgets
by selecting them and choosing an appropriate layout form. The result of what
you have should look something like the screenshot below.
.
This will cause the 3 buttons that were selected to all be lined up together horizontally in
what's called in QT speak a “Layout”. We simply create layouts for our widgets
by selecting them and choosing an appropriate layout form. The result of what
you have should look something like the screenshot below.
Now that we have grouped the FileSelector, ExecButton and CloseButton widgets together, all we need to do is align the text edit with this group of widgets. To do this, click on some empty space inside the dialog, not touching any widgets so that no widgets become selected. left mouse button click the Layout vertically button in the “Layout” toolbar. The widgets expand and fit to the appropriate size for the dialog.
At this point in time, you might to wish to see what your dialog would look like from the user's perspective. You don't have to execute it to do this, simply choose your desired style from the Preview menu and your dialog will be shown as it would for the user. You can make use of this preview facility at any time while working on your dialogs.
We have created a pretty snazzy looking dialog with very little effort, but it doesn't do anything special. In order to achieve some useful functionality, we need to setup our text associations.
Text associations allow us to implement the functionality of the dialog. To understand how we go about this, let's first define some facts.
All widgets need to have unique names so we can identify and use them in text associations.
There's always some kind of text generation in a Kommander dialog. In the case of our simple widget, the text we're generating is the text inside the text edit. Recall, that we call the text inside a widget(perhaps none) the 'widget text' of the widget.
We need to take some kind of action on the generated text. As we stated before we're trying to create a really simple text editor, so the action we need to take is to save the text to a file (we don't implement any reading of text).
So from this, we can easily discern what steps and action we need to take in order to setup our text associations.
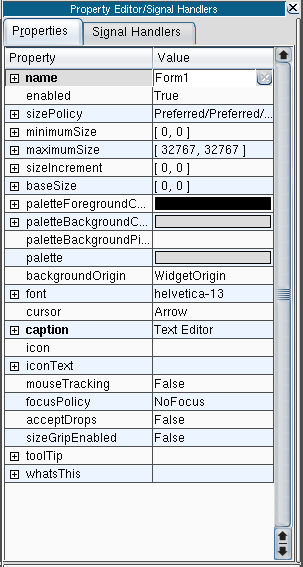
Firstly, let's setup the names of all our widgets to something sensical. The name of a particular widget is something called a 'property'. A property is a value of a widget that can be read, and sometimes written as well. It can be almost any data type, including strings, enumerated types and so on. Some examples of properties include minimum and maximum sizes of the widget, titles, captions, icons, tool tips etc. All properties for a given widget can be set and modified in the Property Editor window of the Editor. This window is denoted in the screenshot below.
Notice in one column are the names of the properties, and in the other column are the values. left mouse button click the TextEdit widget, and then look for the “name” property in the Property Editor - it should be the first property. Modify the value of the name property to be textEdit, by removing the current name and typing in the new one. Repeat these steps for the other widgets, naming the FileSelector fileChooser, the ExecButton saveButton, and the CloseButton closeButton. All of your widgets are now named appropriately.
Secondly, we decided the text being generated was the text inside the text edit; in other words its widget text. To access this text from other widgets, the TextEdit widget needs to include its widget text in its text association. right mouse button click on the TextEdit and select the menu option Edit Text Associations. You are confronted with the dialog below, which is the text association editor.
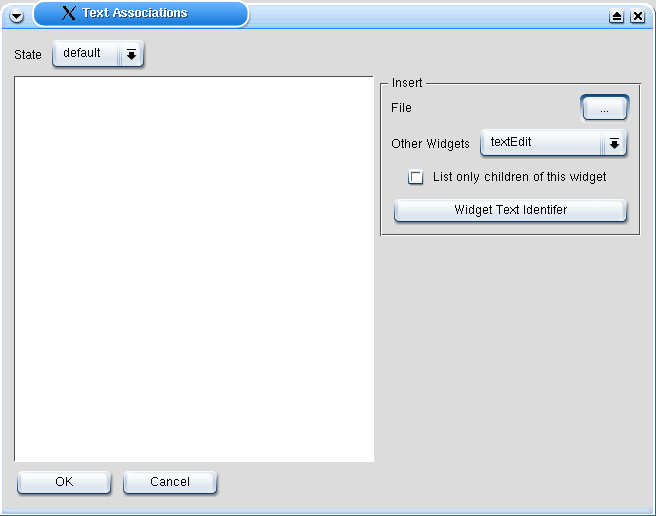
Notice the States combo box only has one value in it, “default”, because our text edit only has one state. Remember, this means we only have one text association. All we need to include in our text association is the special “@widgetText”. You can either type this into the editor, or left mouse button click the convenient Widget Text button which saves you typing it manually. Once this is done, click OK. The text of the text edit is now included in its text association. Repeat these steps for the FileSelector widget, because its text association also needs to be its widget text, which is the text inside the line edit component of it(i.e. the file name that the user has selected).
Lastly, we need to actually save the text inside the text edit. You may have guessed that we're going to implement this using the ExecButton. The ExecButton is a button that when clicked, executes its text association as a shell command. To mimic saving functionality, we are going to print the text edit's text to standard output by passing it as an argument to the echo command, and then redirect that to the file specified in the FileSelector widget.
right mouse button on the ExecButton and select the menu option Edit Text Associations. Type in the following:
echo '@textEdit' > @fileChooser
“@textEdit” will be expanded to the text inside the text edit, and “@fileChooser” will be expanded to the file specified in the FileSelector. This has the end result of saving the text edit's contents to the user specified file. We now have almost finished creating our very first dialog with the Kommander editor.
There are just a few little things we need to change before you've completed your first dialog in Kommander.
By default, the FileSelector widget will bring up an Open dialog to select a file, when we want a Save dialog in this case. This functionality can be changed by setting the selectionType property of the FileSelector. To do this, make sure the FileSelector widget is selected in the dialog and then find the selectionType property in the Property Editor. From the combo box to the right, select the value Save. This will make a Save dialog popup when the user clicks the button in the FileSelector to select a file.
You may have noticed the title of the dialog is some generic name like FormX. To change the title of your dialog, make sure the dialog is selected and that no other widgets are selected, and find the caption property in the Property Editor. Set the name of the dialog to something like “Text Editor”, or whatever you like. The proper title will now appear in the dialog.
All that is left is to adjust the total size of your dialog by left clicking the lower right corner of the dialog and resizing, and then save your dialog if you haven't done so already. Do this by going to File->Save. Select the directory and set the filename you wish to save to and click OK. You've just saved your first functional Kommander dialog. In the next section, we run the dialog by using the Executor component of Kommander.